Product discription:
|
Product Name |
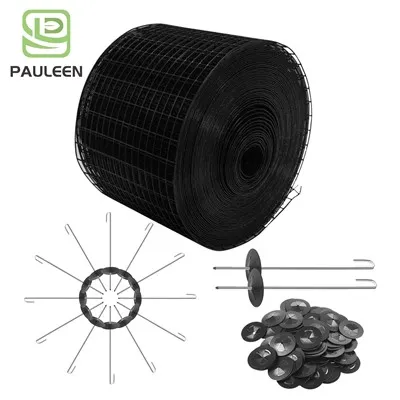
Solar Panel Guard Clips For Bird Proof Pigeon Fence |
|
Brand Name |
Pauleen |
|
Material |
Stainless Steel, Aluminum, Nylon |
|
Contain |
Washer and J Hook |
|
Color |
sliver and black |
|
Size of Washers |
38mm |
|
Usage |
Cleaning, animal control, insect control, plants & garden, farm |
|
Package |
100pcs/bag 50pcs/bag in boxes or plastic zip bag(As your required) |


How To Install Solar Panel Bird Guard
Step 1: Gather the Necessary Tools
Before you start bird-proofing your solar panels, gather all the tools you'll need for the job. Here's a list of essential tools:
● Measuring tape
● Wire mesh
● Clips for securing the mesh
Make sure you have all these tools ready before heading up to the roof.
Step 2: Measure and Cut Wire Mesh
Begin by measuring the area you need to cover with the wire mesh. Cut the wire mesh into appropriate lengths, typically 5-foot or 10-foot strips, using snips or wire cutters. Make sure you have the correct dimensions to match your solar panel layout.
Step 3: Bend and Prepare Wire Mesh
To make the wire mesh more sturdy and secure, you'll need to bend it. Follow these steps to prepare the wire mesh:
● Bend the top edge of the mesh to create a flange. You can use a two-by-four or a similar object for leverage.
● Bend the flange down to create a double layer on the top edge of the mesh.
● To create corners, bend the mesh at a 90-degree angle.
● This preparation ensures the wire mesh fits snugly and securely on your solar panels when you're on the roof.
Step 4: Start Pressure Washing
Before installing the wire mesh, it's crucial to clean the solar panel area thoroughly to remove any bird droppings, feathers, and debris. Here's how to pressure wash the area:
● Begin spraying water under the solar panels, targeting the space between the panels and the roof.
● Make sure to clean the undersides thoroughly, causing debris to fall to the ground.
● Be cautious not to spray the tops of the panels.
● Cleanliness is vital for an effective bird-proofing job.
Step 5: Prepare Safety Gear
Once the cleaning is complete, it's time to prepare for the installation. Ensure your safety by putting on the necessary gear:
● Wear safety gloves and knee pads to protect yourself while working.
● Use a safety harness to prevent any accidents while on the roof.
● Attach a 25-foot measuring tape to measure the mesh strips accurately.
● Calculate the length needed for each strip, accounting for the width and depth of the solar panels.
Step 6: Measure and Cut Wire Mesh Strips
Measure the required length for each wire mesh strip, ensuring they're slightly longer to go around the corners of your solar panels. Cut the strips accordingly.
Step 7: Install Wire Mesh
With the mesh strips prepared, it's time to start the installation. Follow these steps:
● Climb onto the roof and position the wire mesh strips on top of the solar panels.
● Secure the mesh by bending it over the edges of the panels and use clips, cable ties, or tie wraps to fasten it in place.
● Ensure the mesh fits tightly around the edges, leaving no gaps.
Step 8: Complete the Installation
Continue securing the wire mesh around the corners of the solar panels until all panels are covered. Make sure everything is tightly secured and that there are no open spaces where birds could nest.
Hot Tags: solar panel guard clips for bird proof pigeon fence, China solar panel guard clips for bird proof pigeon fence manufacturers, suppliers, factory, Aluminum Clips For Solar Panel Mesh, Nylon Guard Clips For Pigeon Fence, Nylon Solar Panel Clips With Washers, Solar Mesh Fastener Clips, Solar Panel J Clips, Stainless Steel Clips For Solar Panel Mesh